BUMO Keypair Guide
Overview
This document describes in detail the process of generating Keypairs (public and private key pairs) and how to generate an address and sign a transaction based on keypairs. It introduces two interface methods and related processes for executing the transaction call. It provides reference information for ProtoBuf data structures. Finally, it illustrates two methods to submit transactions by showing how to generate transaction_blob with interface call and how to generate transaction_blob by yourself.
Terminology
This section gives details about the terms used in this document.
Keypair
In the BUMO project, the keypair is the interface that generates the
public key, private key, address, and signature. Only the ED25519
signature algorithm is supported during the signing process.
Private Key
The private key is a string generated by the algorithm. The private key is a prerequisite for generating the public key and the address, and is also the basic element for completing the signature. The private key cannot be changed after it is generated. Once it is lost, it cannot be retrieved, so it needs to be kept safely.
Public Key
The public key is a string generated based on the private key. It can verify the string encrypted by the private key. It does not expose the private key when transmitted between networks. It is also a necessary condition for generating an address.
Address
The address is a string generated upon the public key. Similar to real-life addresses, contacts cannot be found without an address, so transactions cannot be completed.
Signature
The Signature refers to the process of encrypting and confirming transaction data by algorithm and private key and obtaining signature data. The user can verify the integrity and correctness of the transaction data through the signature data.
Transaction
All operations that modify blockchain data in BUMO are called transactions, such as issuing assets, transferring assets, sending BUs, creating accounts, setting metadata and setting permissions, etc.
Transaction Blob
The Transaction Blob is a hexadecimal string obtained by serializing a transaction object. Transaction serialization refers to the process of converting the state information of a transaction object into a string that can be stored and transmitted through the ProtoBuf data structure.
Raw Private Key
The Raw Private Key is a byte array obtained by a random algorithm. The Raw Private Key is a prerequisite for generating a private key.
Raw Public Key
The Raw Public Key is a byte array generated by processing the raw
private key with the ED25519 algorithm. The Raw Public Key is a
prerequisite for generating a public key.
Schematic Diagram
The following diagram illustrates how the private, public keys and address are generated.
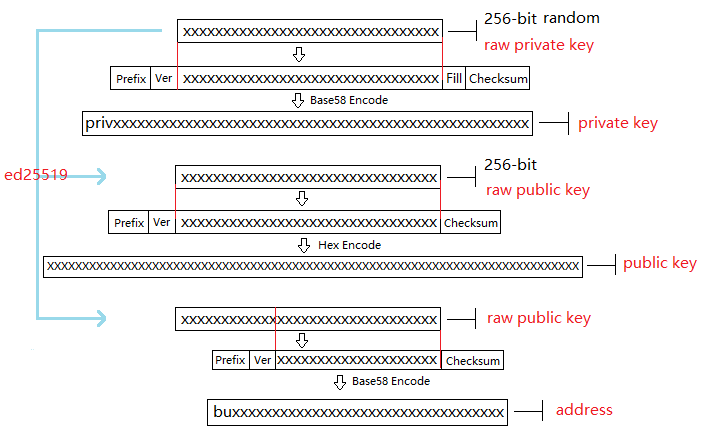
Generating Private Keys
Generating a private key requires multiple algorithms such as a random algorithm and
SHA256. Generating a private key includes the following steps:
1. Generate a 256-bit random number (a private key in the mathematical sense) with a random algorithm and get a byte array, the raw private key, as shown below:
[17,236,24,183,207,250,207,180,108,87,224,39,189,99,246,85,138,120,236,78,228,233,41,192,124,109,156,104,235,66,194,24]
2. Add a 3-byte prefix in the raw private key, and then add a 1-byte version number to get a new byte array, as shown below:
[218,55,159,1,17,236,24,183,207,250,207,180,108,87,224,39,189,99,246,85,138,120,236,78,228,233,41,192,124,109,156,104,235,66,194,24]
Note
For the Prefix, Version and Checksum, please refer to Table 1.
3. Perform SHA256 calculations twice on the byte array obtained in Step
2. Take the first 4 bytes of the operation result as the byte array of
the Checksum, as shown below:
[30,19,80,117]
4. Combine the byte array in Step 2 and the checksum byte array in Step 3 in order, resulting in a new byte array, as shown below:
[218,55,159,1,17,236,24,183,207,250,207,180,108,87,224,39,189,99,246,85,138,120,236,78,228,233,41,192,124,109,156,104,235,66,194,24,30,19,80,117]
5. Encode the byte array generated in Step 4 with Base58, and get the string starting with priv, namely the private key, as shown below:
privbsGZFUoRv8aXZbSGd3bwzZWFn3L5QKq74RXAQYcmfXhhZ54CLr9z
Note
Now the private key is generated.
Table 1
| Name | Data | Length |
|---|---|---|
| Prefix | 0xDA 0x37 0x9F | 3 bytes |
| Version | 0x01 | 1 byte |
| Checksum | After performing SHA256 calculation twice on
the byte array obtained in Step 2,take the first
4 bytes of the operation result |
4 bytes |
This table illustrates the Prefix, Version and Checksum used in generating the private key.
Generating Public Keys
The public key can be generated with the ED25519 algorithm after the
private key is generated. Generating a public key includes the following
steps:
1. Generate a 32-bit byte array (raw public key) by processing the raw
private key with the ED25519 algorithm. For example, the raw public key
of the private key
privbsGZFUoRv8aXZbSGd3bwzZWFn3L5QKq74RXAQYcmfXhhZ54CLr9z is shown
below:
[21,118,76,208,23,224,218,117,50,113,250,38,205,82,148,81,162,27,130,83,208,1,240,212,54,18,225,158,198,50,87,10]
2. Add a 1-byte prefix in the raw public key, and then add a 1-byte version number to get a new byte array, as shown below:
[176,1,21,118,76,208,23,224,218,117,50,113,250,38,205,82,148,81,162,27,130,83,208,1,240,212,54,18,225,158,198,50,87,10]
Note
For the Prefix, Version and Checksum, please refer to Table 2.
3. Perform SHA256 calculation twice on the byte array in Step 2. Take the
first 4 bytes of the operation result as the byte array of the Checksum,
as shown below:
[116,171,22,107]
4. Combine the byte array in Step 2 and the checksum byte array in Step 3 in order, resulting in a new byte array, as shown below:
[176,1,21,118,76,208,23,224,218,117,50,113,250,38,205,82,148,81,162,27,130,83,208,1,240,212,54,18,225,158,198,50,87,10,116,171,22,107]
5. Encode the byte array in Step 4 into hexadecimal and get a hexadecimal string, namely the public key, as shown below:
b00115764cd017e0da753271fa26cd529451a21b8253d001f0d43612e19ec632570a74ab166b
Note
Now the public key is generated.
Table 2
| Name | Data | Length |
|---|---|---|
| Prefix | 0xB0 | 1 Byte |
| Version | 0x01 | 1 Byte |
| Checksum | After performing
SHA256 calculation
twice on the byte
array obtained in
Step 2, take the
first 4 bytes of the
operation result |
4 Bytes |
This table illustrates the Prefix, Version and Checksum used in generating the public key.
Generating Addresses
The address can be further generated by an algorithm after generating the private key and the public key. Generating an address includes the following steps:
1. Generate a 32-bit byte array (raw public key) by processing the raw
private key with the ED25519 algorithm. For example, the raw public key
of the private key
privbsGZFUoRv8aXZbSGd3bwzZWFn3L5QKq74RXAQYcmfXhhZ54CLr9z is shown
below:
[21,118,76,208,23,224,218,117,50,113,250,38,205,82,148,81,162,27,130,83,208,1,240,212,54,18,225,158,198,50,87,10]
2. Perform SHA256 calculation twice on the raw public key and take the
last 20 bytes of the operation result as the byte array, as shown below:
[173,148,59,51,183,193,55,160,1,133,247,80,65,13,67,190,164,114,18,220]
3. Add a 2-byte prefix in the byte array generated in Step 2, and then add a 1-byte version number to get a new byte array, as shown below:
[1,86,1,173,148,59,51,183,193,55,160,1,133,247,80,65,13,67,190,164,114,18,220]
Note
For the Prefix, Version and Checksum, please refer to Table 3.
4. Perform SHA256 calculation twice on the byte array in Step 3. Take the
first 4 bytes of the operation result as the byte array of the Checksum,
as shown below:
[167,127,34,35]
5. Combine the byte array in Step 3 and the Checksum byte array in Step 4 in order, resulting in a new byte array, as shown below:
[1,86,1,173,148,59,51,183,193,55,160,1,133,247,80,65,13,67,190,164,114,18,220,167,127,34,35]
6. Encode the byte array generated in Step 5 with Base58, and get the string starting with bu, namely the address, as shown below:
buQmWJrdYJP5CPKTbkQUqscwvTGaU44dord8
Note
Now the address is generated.
Table 3
| Name | Data | Length |
|---|---|---|
| Prefix | 0x01 0x56 | 2 Bytes |
| Version | 0x01 | 1 Byte |
| PublicKey | Take the last 20 bytes in raw public key | 20 Bytes |
| Checksum | After performing
SHA256 calculation
twice on the byte
array obtained in
step 3, take the
first 4 bytes of the
operation result |
4 Bytes |
This table illustrates the Prefix, Version and Checksum used in generating the address.
Signing Transactions
Sign the pending transaction (the byte array obtained by the inverse
hexadecimal encoding of the transaction_blob) with the ED25519 algorithm
and the private key, and perform hexadecimal conversion to get
sign_data, the signature string.
The following example shows how to sign the transaction_blob with
ED25519 and the private key.
The private key:
b00115764cd017e0da753271fa26cd529451a21b8253d001f0d43612e19ec632570a74ab166b
The transaction_blob:
0A24627551566B5555424B70444B526D48595777314D553855376E676F5165686E6F31363569109F0818C0843D20E80732146275696C642073696D706C65206163636F756E743A5F08011224627551566B5555424B70444B526D48595777314D553855376E676F5165686E6F3136356922350A246275516E6936794752574D4D454376585850673854334B35615A557551456351523670691A0608011A02080128C7A3889BAB20
After signing the transaction_blob with the signature interface of
ED25519 and performing hexadecimal conversion, the resulting sign_data
is:
a46ee590a84abdeb8cc38ade1ae8e8a2c71bb69bdc4cd7dc0de1b74b37e2cbd1696229687f80dff4276b1a3dd3f95a9bc1d569943b337fe170317430f36d6401
Methods of Submitting Transactions
There are two methods of calling the interface to execute transactions: Generating Transaction_blobs by Calling the Interface and Generating Transaction_blobs by Yourself.
Generating Transaction_blobs by Calling the Interface
Attention
As the transaction_blob is likely to be intercepted and tampered with, it is not recommended to generate transaction_blobs in this way.
If you need to call the interface to generate transaction_blobs, sign and submit transactions, please refer to the BUMO development documentation at the following address:
https://github.com/bumoproject/bumo/blob/master/docs/develop.md
Calling the interface to generate a transaction_blob includes the following steps:
1. Call the getAccount interface to get the nonce value of the account that is to initiate a transaction. The code is shown below:
HTTP GET host:port/getAccount?address=account address
2. Populate the json data as needed and complete filling the transaction data. The format is shown below:
{
"source_address":"xxxxxxxxxxx", //The source transaction account, the originator of the transaction
"nonce":2, //Nonce value
"ceil_ledger_seq": 0, //Optional
"fee_limit":1000, //Fee paid in transaction
"gas_price": 1000, //Gas price (Not less than the configured value)
"metadata":"0123456789abcdef", //Optional, metadata for the transaction given by users, in hexadecimal format
"operations":[
{
//Populate according to specific operations
},
{
//Populate according to specific operations
}
......
]
}
Note
The nonce value needs to be incremented by 1 based on the value obtained in Step 1.
3. By calling the getTransactionBlob interface, the json data generated in Step 2 is passed as a parameter, and a transaction hash and a transaction_blob are obtained to implement transaction serialization. The format is shown below:
{
"error_code": 0,
"error_desc": "",
"result": {
"hash": "xxxxxxxxxxxxxxxxxxxxxxxxxxxxxxxxxxxxxxxxxxxxxxxxxx", //Transaction hash
"transaction_blob": "xxxxxxxxxxxxxxxxxxxxxxxxxxxxxxxxxx" //The hexadecimal representation after the transaction is serialized
}
}
4. Sign the transaction and populate the transaction data. Sign the transaction_blob according to the previously generated private key, and then populate the json data of the submitted transaction. The format is shown below:
{
"items" : [{
"transaction_blob" : "xxxxxxxxxxxxxxxxxxxxxxxxxxxxxxxxxxxxxxxxxxxxx", //The hexadecimal representation after the transaction is serialized
"signatures" : [{//The first signature
"sign_data" : "xxxxxxxxxxxxxxxxxxxxxxxxxxxxxxxxxxxxxxxxxxx", //Signature data
"public_key" : "xxxxxxxxxxxxxxxxxxxxxxxxxxxxxxxxxxxxxx" //Public key
}, {//The second signature
"sign_data" : "xxxxxxxxxxxxxxxxxxxxxxxxxxxxxxxxxxxxxxxxxxx", //Signature data
"public_key" : "xxxxxxxxxxxxxxxxxxxxxxxxxxxxxxxxxxxxxx" //Public key
}
]
}
]
}
5. By calling the submitTransaction interface, the json data generated in Step 4 is passed as a parameter, the response result is obtained and transaction submission is completed. The format of the response result is shown below:
{
"results": [
{
"error_code": 0,
"error_desc": "",
"hash": "xxxxxxxxxxxxxxxxxxxxxxxxxxxxxxxxxxxxxxxxxxxxxxxxxx" //Transaction hash
}
],
"success_count": 1
}
Generating Transaction_blobs by Yourself
Generating the transaction_blob by yourself, signing, and submitting the transaction include the following steps:
1. Call the getAccount interface to get the nonce value of the account that is to initiate a transaction. The code is shown below:
HTTP GET host:port/getAccount?address=account address
2. Populate the transaction object (Transaction) of the protocol buffer and serialize it to get the transaction_blob. For details of the specific transaction data structure, please refer to ProtoBuf Data Structure.
3. Sign the transaction and populate the transaction data. Generate a public key based on the private key, sign the transaction _blob with the private key, and then populate the json data of the submitted transaction. The format is shown below:
{
"items" : [{
"transaction_blob" : "xxxxxxxxxxxxxxxxxxxxxxxxxxxxxxxxxxxxxxxxxxxxx", //The hexadecimal representation after the transaction is serialized
"signatures" : [{//The first signature
"sign_data" : "xxxxxxxxxxxxxxxxxxxxxxxxxxxxxxxxxxxxxxxxxxx", //Signature data
"public_key" : "xxxxxxxxxxxxxxxxxxxxxxxxxxxxxxxxxxxxxx" //Public key
}, {//The second signature
"sign_data" : "xxxxxxxxxxxxxxxxxxxxxxxxxxxxxxxxxxxxxxxxxxx", //Signature data
"public_key" : "xxxxxxxxxxxxxxxxxxxxxxxxxxxxxxxxxxxxxx" //Public key
}
]
}
]
}
4. By calling the submitTransaction interface, the json data generated in Step 3 is passed as a parameter to complete the transaction submission. The response result format is shown below:
{
"results": [
{
"error_code": 0,
"error_desc": "",
"hash": "xxxxxxxxxxxxxxxxxxxxxxxxxxxxxxxxxxxxxxxxxxxxxxxxxx" //Transaction hash
}
],
"success_count": 1
}
ProtoBuf Data Structure
Protocol Buffer (ProtoBuf) is a lightweight and efficient structured
data storage format that can be used for serializing structured data. It
is ideal for data storage or RPC data exchange formats. It can be used
in communication protocols, data storage and other fields of
language-independent, platform-independent, scalable serialized
structured data formats. Currently the APIs in C++, Java, and Python are
available.
For more information aobut ProtoBuf, please refer to the following link:
https://developers.google.com/protocol-buffers/docs/overview
Now, we will introduce the data structure details of Protocol Buffer, and provide the file and simple test program for the protocol buffer of various languages generated by the script.
Data Structure
The following section describes the various ProtoBuf data structures that might be used in transactions and their uses for your reference.
Transaction
This data structure is for complete transactions.
message Transaction {
enum Limit{
UNKNOWN = 0;
OPERATIONS = 1000;
};
string source_address = 1; // Account address of the transaction initiator
int64 nonce = 2; // Transaction sequence number
int64 fee_limit = 3; // The transaction fee, by default is 1000Gas; the unit is MO, 1 BU = 10^8 MO
int64 gas_price = 4; // The packaging fee of transactions, by default is 1000; the unit is MO,1 BU = 10^8 MO
int64 ceil_ledger_seq = 5; // Block bound
bytes metadata = 6; // Transaction metadata
repeated Operation operations = 7; // Operation list
}
Operation
This data structure is for operations in transactions.
message Operation {
enum Type {
UNKNOWN = 0;
CREATE_ACCOUNT = 1;
ISSUE_ASSET = 2;
PAY_ASSE = 3;
SET_METADATA = 4;
SET_SIGNER_WEIGHT = 5;
SET_THRESHOLD = 6;
PAY_COIN = 7;
LOG = 8;
SET_PRIVILEGE = 9;
};
Type type = 1; // Operation type
string source_address = 2; // Source account address for the operation
bytes metadata = 3; // Operation metadata

OperationCreateAccount create_account = 4; // Create an account operation
OperationIssueAsset issue_asset = 5; // Issue assets operation
OperationPayAsset pay_asset = 6; // Transfer assets operation
OperationSetMetadata set_metadata = 7; // Set metadata
OperationSetSignerWeight set_signer_weight = 8; // Set privilege for signer
OperationSetThreshold set_threshold = 9; // Set transaction threshold
OperationPayCoin pay_coin = 10; // Transfer coin
OperationLog log = 11; // Record log
OperationSetPrivilege set_privilege = 12; // Set privilege
}
OperationCreateAccount
This data structure is for creating accounts.
message OperationCreateAccount{
string dest_address = 1; // Target account address to be created
Contract contract = 2; // Contract
AccountPrivilege priv = 3; // Privilege
repeated KeyPair metadatas = 4; // Additional info
int64 init_balance = 5; // Initiation balance
string init_input = 6; // Input parameter for contracts
}
Contract
This data structure is for setting contracts.
message Contract{
enum ContractType{
JAVASCRIPT = 0;
}
ContractType type = 1; // Contract type
string payload = 2; // Contract code
}
AccountPrivilege
This data structure is for setting account privilege.
message AccountPrivilege {
int64 master_weight = 1; // Account weight
repeated Signer signers = 2; // Signer weight list
AccountThreshold thresholds = 3; // Threshold
}
Signer
This data structure is for setting signer weight.
message Signer {
enum Limit{
SIGNER_NONE = 0;
SIGNER = 100;
};
string address = 1; // Signer account address
int64 weight = 2; // Signer weight
}
AccountThreshold
This data structure is for setting account threshold.
message AccountThreshold{
int64 tx_threshold = 1; // Transaction threshold
repeated OperationTypeThreshold type_thresholds = 2; // Specify the transaction threshold list for the operations. The threshold for the transactions with unspecified operation is set by tx_threshold
}
OperationTypeThreshold
This data structure is for operation threshold of specified types.
message OperationTypeThreshold{
Operation.Type type = 1; // Operation type
int64 threshold = 2; // Corresponding threshold of this operation
}
OperationIssueAsset
This data structure is for issuing assets.
message OperationIssueAsset{
string code = 1; // Asset encoding to be issued
int64 amount = 2; // Asset amount to be issued
}
OperationPayAsset
This data structure is for transferring assets.
message OperationPayAsset {
string dest_address = 1; // Target account address
Asset asset = 2; // Asset
string input = 3; // Input parameter for contracts
}
Asset
This data structure is for asset.
message Asset{
AssetKey key = 1; // Asset identification
int64 amount = 2; // Asset amount
}
AssetKey
This data structure is for identifying the uniqueness of asset.
message AssetKey{
string issuer = 1; // Account address of asset issuer
string code = 2; // Asset encoding
int32 type = 3; // Asset type(by default is 0, which indicates the amount is not limited)
}
OperationSetMetadata
This data structure is for setting Metadata.
message OperationSetMetadata{
string key = 1; // keyword, unique
string value = 2; // Content
int64 version = 3; // Version control, optional
bool delete_flag = 4; // Whether it is deletable
}
OperationSetSignerWeight
This data structure is for setting signer weight.
message OperationSetSignerWeight{
int64 master_weight = 1; // Self weight
repeated Signer signers = 2; // Signer weight list
}
OperationSetThreshold
This data structure is for setting threshold.
message OperationSetThreshold{
int64 tx_threshold = 1; // Transaction threshold
repeated OperationTypeThreshold type_thresholds = 2; // The transaction threshold list for specified operations. The threshold for the transactions with unspecified operation is set by tx_threshold

}
OperationPayCoin
This data structure is for sending coin.
message OperationPayCoin{
string dest_address = 1; // Target account address
int64 amount = 2; // Coin amount
string input = 3; // Input parameter for contracts
}
OperationLog
This data structure is for recording log information.
message OperationLog{
string topic = 1; // Log theme
repeated string datas = 2; // Log content
}
OperationSetPrivilege
This data structure is for setting account privilege.
message OperationSetPrivilege{
string master_weight = 1; // Account weight
repeated Signer signers = 2; // Signer weight list
string tx_threshold = 3; // Transaction threshold
repeated OperationTypeThreshold type_thresholds = 4; // The transaction threshold list for specified operations. The threshold for the transactions with unspecified operation is set by tx_threshold

}
Examples
This section provides examples of proto scripts, as well as proto source
code generated by cpp, java, javascript, pyton, object-c, and php. For
more information, please refer to the following link:
https://github.com/bumoproject/bumo/tree/develop/src/proto
Description of the directory structure in the above link is shown below:
- cpp: C++ source code
- io: Java source code
- go: Go source and test program
- js: Javascript source code and test program
- Python: Python source code and test program
- ios: Object-c source code and test program
- php: PHP source code and test program
Examples for Transaction Submission
Scenario: Account A(buQVkUUBKpDKRmHYWw1MU8U7ngoQehno165i)creates
account B (Generate an address by Generating Addresses in Keypair).
Generating Transaction_blobs by Interface
Generating transaction_blobs by the interface includes the following steps:
1. Obtain the nonce value of the account to initiate a transaction by GET.
GET http://seed1.bumotest.io:26002/getAccount?address=buQsurH1M4rjLkfjzkxR9KXJ6jSu2r9xBNEw
Response message:
{
"error_code" : 0,
"result" : {
"address" : "buQsurH1M4rjLkfjzkxR9KXJ6jSu2r9xBNEw",
"assets" : [
{
"amount" : 1000000000,
"key" : {
"code" : "HNC",
"issuer" : "buQBjJD1BSJ7nzAbzdTenAhpFjmxRVEEtmxH"
}
}
],
"assets_hash" : "3bf279af496877a51303e91c36d42d64ba9d414de8c038719b842e6421a9dae0",
"balance" : 27034700,
"metadatas" : null,
"metadatas_hash" : "ad67d57ae19de8068dbcd47282146bd553fe9f684c57c8c114453863ee41abc3",
"nonce" : 5,
"priv" : {
"master_weight" : 1,
"thresholds" : [{
"tx_threshold" : 1
}
]
}
}
}
address: Current query account address
assets: Account asset list
assets_hash: Asset list hash
balance: Account balance
metadata: Account metadata in hexadecimal format
metadatas_hash: Transaction metadata hash
nonce: The sending transaction serial number, the nonce+1 returned by querying the account information interface
priv: Privilege
master_weight: Current account weight
thresholds: Threshold
tx_threshold: Transaction default threshold
- Complete populating the transaction data.
The account address of account B generated by Generating Address in Keypair
is buQoP2eRymAcUm3uvWgQ8RnjtrSnXBXfAzsV, the populated json data is
shown below:
{
"source_address":"buQsurH1M4rjLkfjzkxR9KXJ6jSu2r9xBNEw",
"nonce":7,
"ceil_ledger_seq": 0,
"fee_limit":1000000,
"gas_price": 1000,
"metadata":"",
"operations":[
{
"type": 1,
"create_account": {
"dest_address": "buQoP2eRymAcUm3uvWgQ8RnjtrSnXBXfAzsV",
"init_balance": 10000000,
"priv": {
"master_weight": 1,
"thresholds": {
"tx_threshold": 1
}
}
}
}
]
}
Note
The nonce value is not 6, so this transaction would fail.
- Serialize the transaction data.
POST http://seed1.bumotest.io:26002/getTransactionBlob
Request message:
4.1.2 populated jason data
Response message:
{
"error_code": 0,
"error_desc": "",
"result": {
"hash": "be4953bce94ecd5c5a19c7c4445d940c6a55fb56370f7f606e127776053b3b51",
"transaction_blob": "0a2462755173757248314d34726a4c6b666a7a6b7852394b584a366a537532723978424e4577100718c0843d20e8073a37080122330a246275516f50326552796d4163556d33757657675138526e6a7472536e58425866417a73561a0608011a0208012880ade204"
}
}
- Sign the transaction_blob with the private key.
Import package: import io.bumo.encryption.key.PrivateKey;
Private key:
privbvTuL1k8z27i9eyBrFDUvAVVCSxKeLtzjMMZEqimFwbNchnejS81

The sign_data after being signed:
9C86CE621A1C9368E93F332C55FDF423C087631B51E95381B80F81044714E3CE3DCF5E4634E5BE77B12ABD3C54554E834A30643ADA80D19A4A3C924D0B3FA601
- Complete populating the transaction data.
{
"items" : [{
"transaction_blob" : "0a2462755173757248314d34726a4c6b666a7a6b7852394b584a366a537532723978424e4577100718c0843d20e8073a37080122330a246275516f50326552796d4163556d33757657675138526e6a7472536e58425866417a73561a0608011a0208012880ade204",
"signatures" : [{
"sign_data" : "9C86CE621A1C9368E93F332C55FDF423C087631B51E95381B80F81044714E3CE3DCF5E4634E5BE77B12ABD3C54554E834A30643ADA80D19A4A3C924D0B3FA601",
"public_key" : "b00179b4adb1d3188aa1b98d6977a837bd4afdbb4813ac65472074fe3a491979bf256ba63895"
}
]
}
]
}
- Submit the transaction by POST.
POST http://seed1.bumotest.io/submitTransaction
Response message:
{
"results": [{
"error_code": 0,
"error_desc": "",
"hash": "be4953bce94ecd5c5a19c7c4445d940c6a55fb56370f7f606e127776053b3b51"
}
],
"success_count": 1
}
Note
“success_count”:1 represents that the submission succeeded.
Generating Transaction_blobs by Yourself
Generating transaction_blobs by yourself (take Java as an example)
includes the following steps:
1. Obtain the nonce value of the account that is to initiate a transaction by GET.
GET http://seed1.bumotest.io:26002/getAccount?address=buQsurH1M4rjLkfjzkxR9KXJ6jSu2r9xBNEw
Response message:
{
"error_code" : 0,
"result" : {
"address" : "buQsurH1M4rjLkfjzkxR9KXJ6jSu2r9xBNEw",
"assets" : [
{
"amount" : 1000000000,
"key" : {
"code" : "HNC",
"issuer" : "buQBjJD1BSJ7nzAbzdTenAhpFjmxRVEEtmxH"
}
}
],
"assets_hash" : "3bf279af496877a51303e91c36d42d64ba9d414de8c038719b842e6421a9dae0",
"balance" : 27034700,
"metadatas" : null,
"metadatas_hash" : "ad67d57ae19de8068dbcd47282146bd553fe9f684c57c8c114453863ee41abc3",
"nonce" : 5,
"priv" : {
"master_weight" : 1,
"thresholds" : [{
"tx_threshold" : 1
}
]
}
}
}
address: Current query account address
assets: Account asset list
assets_hash: Asset list hash
balance: Account balance
metadata: Account metadata in hexadecimal format
metadatas_hash: Transaction metadata hash
nonce: The sending transaction serial number, the nonce+1 returned by querying the account information interface

priv: Privilege
master_weight: Current account weight
thresholds: Threshold
tx_threshold: Transaction default threshold
2. Populate the transaction data structure and generate a transaction_blob.
Import package: import io.bumo.sdk.core.extend.protobuf.Chain;
Chain.Transaction.Builder builder = Chain.Transaction.newBuilder();
builder.setSourceAddress("buQsurH1M4rjLkfjzkxR9KXJ6jSu2r9xBNEw");
builder.setNonce(7);

builder.setFeeLimit(1000 * 1000);
builder.setGasPrice(1000);
builder.setCeilLedgerSeq(0);
builder.setMetadata(ByteString.copyFromUtf8(""));

Chain.Operation.Builder operation = builder.addOperationsBuilder();
operation.setType(Chain.Operation.Type.CREATE_ACCOUNT);

Chain.OperationCreateAccount.Builder operationCreateAccount = Chain.OperationCreateAccount.newBuilder();
operationCreateAccount.setDestAddress("buQoP2eRymAcUm3uvWgQ8RnjtrSnXBXfAzsV");
operationCreateAccount.setInitBalance(10000000);

Chain.AccountPrivilege.Builder accountPrivilegeBuilder = Chain.AccountPrivilege.newBuilder();
accountPrivilegeBuilder.setMasterWeight(1);

Chain.AccountThreshold.Builder accountThresholdBuilder = Chain.AccountThreshold.newBuilder();
accountThresholdBuilder.setTxThreshold(1);

accountPrivilegeBuilder.setThresholds(accountThresholdBuilder);
operationCreateAccount.setPriv(accountPrivilegeBuilder);
operation.setCreateAccount(operationCreateAccount);
String transaction_blob = HexFormat.byteToHex(builder.build().toByteArray());

The transaction_blob obtained:
0a2462755173757248314d34726a4c6b666a7a6b7852394b584a366a537532723978424e4577100718c0843d20e8073a37080122330a246275516f50326552796d4163556d33757657675138526e6a7472536e58425866417a73561a0608011a0208012880ade204
Note
The nonce value is not 6, so this transaction would fail.
- Sign the transaction_blob with the private key.
Import package: import io.bumo.encryption.key.PrivateKey;
The private key:
privbvTuL1k8z27i9eyBrFDUvAVVCSxKeLtzjMMZEqimFwbNchnejS81

The sign_data after being signed:
9C86CE621A1C9368E93F332C55FDF423C087631B51E95381B80F81044714E3CE3DCF5E4634E5BE77B12ABD3C54554E834A30643ADA80D19A4A3C924D0B3FA601
- Complete populating the transaction data.
{
"items" : [{
"transaction_blob" : "0a2462755173757248314d34726a4c6b666a7a6b7852394b584a366a537532723978424e4577100718c0843d20e8073a37080122330a246275516f50326552796d4163556d33757657675138526e6a7472536e58425866417a73561a0608011a0208012880ade204",
"signatures" : [{
"sign_data" : "9C86CE621A1C9368E93F332C55FDF423C087631B51E95381B80F81044714E3CE3DCF5E4634E5BE77B12ABD3C54554E834A30643ADA80D19A4A3C924D0B3FA601",
"public_key" : "b00179b4adb1d3188aa1b98d6977a837bd4afdbb4813ac65472074fe3a491979bf256ba63895"
}
]
}
]
}
- Submit the transaction by POST.
POST http://seed1.bumotest.io/submitTransaction
Response message:
{
"results": [{
"error_code": 0,
"error_desc": "",
"hash": "be4953bce94ecd5c5a19c7c4445d940c6a55fb56370f7f606e127776053b3b51"
}
],
"success_count": 1
}
Note
“success_count”:1 represents that the submission succeeded.